 |
|
|
|
Last Updated: 2/21/14
Creating a Pond for Wildlife
Step-by-Step Guide for a Simple Wildlife Pond
On Other of Robyn's Web Pages:
Pond Setup
Pond Installation
The Organic Pond
Specific Wildlife:
Article: The Five Best Marginals for a Wildlife Pond
Guide: Pond Egg Identification Guide
Short Article: Dealing with visiting wildlife - I wrote this short article for Organic Gardening.
UNDER CONSTRUCTION! Let me know what else I should cover on this page!

When creating a pond specifically for wildlife, there are a few things to consider differently than when creating a pond specifically for fish or aquatic plants. While it is certainly 100% true that any pond will attract wildlife, if you want a pond that really helps wildlife optimally, that pond should be made with wildlife in mind. For example, a fish-less pond will greatly benefit frogs, toads, newts, salamanders, insects, and other animals that fish would normally eat. While many of these animals may escape the jaws of fish to live among them, even more survive in a fish-less pond. Amphibians also prefer waters that are still, warm, and shallow (although frogs whose tadpoles take more than a year to change into frogs do require waters deep enough not to freeze).
As the section on attracting wildlife states, a pond meant mostly for wildlife should also be easy for animals to wade into and to get out of as well.
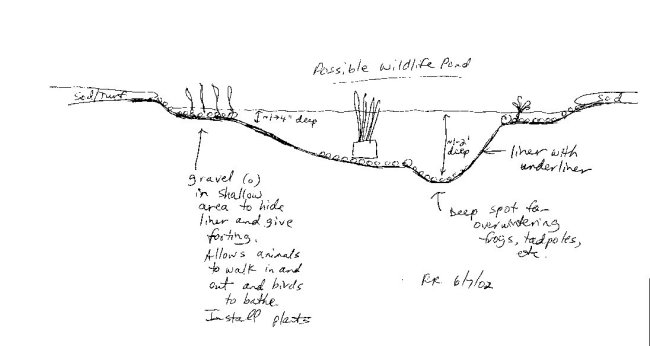
This is an example of a simple, inexpensive wildlife pond that one could make to benefit local amphibians, insects, and other wildlife. Basic supplies required include a small liner (you pick the size but 10' x 8' might be good to start), a bag of sand or a pile of newspapers, a shovel, a pile of rocks or edging, pea gravel, a level, and assorted live pond plants. If a large pond is being built, the scrap liner often makes a good wildlife pond. While a pre-formed pond, stock tank, or even kiddie pool can be used, these rarely have the proper ramps in and out for wildlife or enough depth for overwintering in colder areas. Pre-formed ponds are usually very expensive and shallow. As this example pond is meant to be a simple pond for wildlife, overflows, filtration, and hiding the liner are not considered as important as with other ponds but they can be added if desired. A wildlife pond is a great world of discovery for all ages! Put some pond water under a microscope and see even more critters you never knew existed!
Step 1: Determine where you want the pond to be. It should be near enough to the house to easily visit and maintain but not so near as to scare off wildlife. It should receive some sunlight but not as much as for watergardens, maybe 2-8 hours of light a day. Be sure the spot chosen has no buried wires, cables, pipes, etc.
Step 2: Assuming you have a 10' x 8' liner and you want a depth of mostly a foot but some areas of about 1.5 feet, then the size of the pond will be 5' x 3' as you subtract twice the maximum depth and two additional feet (one foot overlap on all sides around the rim). This makes a nice sized pond but you can use smaller or larger liners to suit your budget and space. Mark off an area not to exceed a rectangular 5' x 3' in this case. It can be oddly shaped as long as it stays within those boundaries. Then, begin digging. You can dig almost any pattern as long as you do not go beyond your allotted depth (in this case, 1.5 feet; to get more depth, you'll need more liner). With a smaller pond, the easiest way to do this is to make half the pond the full 1.5 feet on one side. Then, use the other half to decrease the depth gradually so that it eventually reaches surface level. That way, animals can walk right into the pond. With larger ponds, often the center is the deepest with ledges or ramps all the way around. Also, the upper edge of the pond needs to be level. It can be checked by placing a board over the hole and then a level on top.
Step 3: Check to see if the liner fits nicely into the hole with about a foot overlap or more around the edges. If there is not enough overlap, then put some dirt back. If there is lots of liner left, dig more out. Once that seems okay, cover the bottom of the hole with half an inch to an inch of sand or old newspapers for cushioning.
Step 4: Lay in the liner. Carefully fit the liner to the shape of the hole. Slowly add water to the pond and fix the liner's position as it fills. Once near the top, let the pond settle for at least half a day. The water will pull down the liner further. If an overflow is desired, the lowest spot along the liner can be dug out just enough that water will drain out there or a different location can be chosen.
Step 5: Once the liner has settled, rocks can be placed around the portion of the liner that is above ground. The rocks hold down the liner and also hide it. For an ideal wildlife pond, whatever rocks are local would be used. Formal bricks, walking stones, etc. can be used (the wildlife probably will not care too much) but will not appear as natural.
Step 6: Squirt off the rocks well. Drain the pond. The last bit of dirty water can be removed using a wet-dry shop vacuum. Get some pea gravel. Wash it until it is relatively clear in a bucket. Cover all the exposed liner that is flat enough with pea gravel. You can also put in a few of the larger rocks used as edging. Animals will hide in the gravel. It also hides most of the liner and provides rooting places for plants. As an alternative, some people cover the entire liner with clay dirt. Then that is covered with pea gravel. Then, the whole pond becomes plantable. It would be very hard to clean though but great for wildlife, at least when new.
Step 7: Refill the pond to the top. Add proper amounts of dechlorinator if you have city water. The addition of some beneficial bacteria (like BZT from United Tech and/or Stress-Zyme by Aquarium Pharmaceuticals) also will help the pond become established. Put in mosquito dunks to control mosquitoes (for more information and alternatives, see the section on mosquitoes). In most ponds, fish will take care of mosquitoes but obviously fish-less ponds have no fish!
Step 8: Aquatic plants may be added to the pond. They can be planted right in the gravel if the pond is small or in pots in larger ponds. There are hundreds of plants to chose from (see my plant pages). After the pond has sat for a few days, animals like tadpoles, salamander larvae, snails, and even insect larvae that can be bought or collected locally (with legal permission of the land owner and government) at various places can be added to the pond to "make things happen faster." I have gotten daphnia, snails, tadpoles, salamander larvae, aquatic worms, and insect larvae from a neighboring pond. A new wildlife pond can also be innoculated with water from an established pond to introduce good bacteria and microorganisms. Be aware that any bad ones will come with the water too! Thus, if keeping ornamental fish, it is often better not to add potential parasites to the pond via water from another pond. If the pond is only for wildlife, it is a good idea to add water from a healthy local pond.
Step 9: What is so great about this type of wildlife pond? You do not have to have a pump, filter, etc.! Yes, the pond may stagnate somewhat in summer but that is actually the way many wild animals like it! You cannot really change the water because you would toss out some of the smaller animals. A small pump and filter would work well in a small wildlife pond to help with stagnation though. Of my seven ponds, only two have equipment. Despite this, most are clear most of the time! A cleaning in the spring is all that is needed. Just be careful not to throw out the tiny animals with the dirty water! Also, for an all-natural pond, never add dangerous chemicals like herbicides or pesticides. If algae is a problem, see my algae page for helpful all-natural ideas such as barley straw, lots of plants, and good bacteria. Remember, algae is sometimes our friend!
Step 10: Wait! If you build it, they will come. Insects will come to lay eggs within days. If it is toad or frog breeding season, they will find the pond in days as well. If all goes well, soon your pond will be full of native tadpoles, salamander larvae, dragonfly nymphs, mayflies, bathing songbirds, thirsty mammals, and so much more! And, if you have other ponds devoted to fish and aquatic plants, you will not even miss not having them in your new wildlife pond! Just do not forget to restock those mosquito dunks when they run down, or you'll soon have a nice mosquito pond! Hey, but even that is great as it provides food for local dragonflies and bats! I once met a pond keeper who has a tiny (2 gallons maybe) mosquito larvae pond for the bats! Just do not go out after dark! Just kidding! The bats ate most of her mosquitoes!
Back to Robyn's Pond Page
|
|
Pet Link Banner Exchange: |
|
|
|
There have been 51,181,002 file views (file views since 2006, page views before that) to Fishpondinfo from December 1, 2003 through August 17, 2019 (stats lost after that). |
|

|

|
E-mail RobynCopyright © 1997-2026 Robyn Rhudy |

|
 |